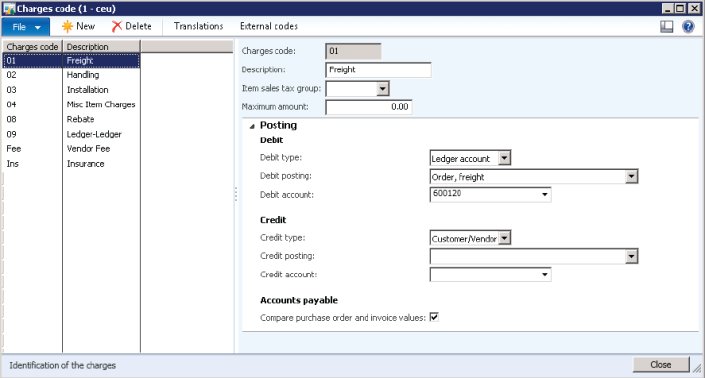
Before you plan to add manual or automatic charges when you create a sales or purchase order, you must setup Charges Codes. They are used to define the kind of charge and how the charge is going to be debited or credited. You can setup charges by navigating to Setup → Charges → Charges codes in the following 3 modules:
1. Accounts Receivable
2. Accounts Payable
3. Procurement and Sourcing
2. Accounts Payable
3. Procurement and Sourcing
Fields on the Charges codes form are described below:
1. Charges code: Unique code for the charge
2. Description: Brief description about the charge
3. Item sales tax group: An item sales tax group that can be used for calculating taxes on the charge
4. Maximum amount: Maximum amount allowed for the charge
2. Description: Brief description about the charge
3. Item sales tax group: An item sales tax group that can be used for calculating taxes on the charge
4. Maximum amount: Maximum amount allowed for the charge
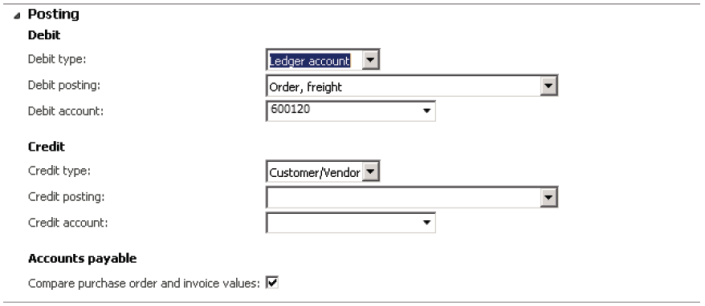
Posting FastTab
This is where the actual game happens. In this posting fastTab we define how to automatically debit and credit the charge. Both debit and credit sections have the following fields:
1. Type – Defines the entity which will be billed for the charge. Following are the available options:
- Item – Charge is added to the item cost
- Ledger Account – Charge is billed internally to the ledger account
- Customer/Vendor – Charge is billed to the customer/vendor
2. Posting – Free text field to give the description which will be used while posting the charge to journals
3. Account - Defines the ledger account which must be debited/credited when Type is set to Ledger Account
So far we have understood what is the purpose of different parameters used to configure charges codes. Let us now create charges codes for sales and purchases. In both cases the parameters discussed will be set differently to cater to different needs of sales and purchases.
Charges Codes for Sales
For sales, you can configure charges in 2 different ways:
1. Customer
Charge is billed to the customer and is added to the sales order totals. Follow the steps below to achieve this functionality:
1. Open Accounts receivable > Setup > Charges > Charges code.
2. Click New to add a new code.
3. In the Charges code field, type a unique identifier for this charge.
4. In the Description field, type a short description of the charge.
5. Click the Item sales tax group arrow and select the sales tax group.
6. Click the Posting tab.
7. Setup the debit/credit fields as follows:
| Debit | Type | Customer/Vender |
| Posting | N/A | |
| Account | N/A | |
| Credit | Type | Ledger Account |
| Posting | Specify | |
| Account | Specify |
2. Ledger Account (Internal)
Charge is billed to an internal ledger account and does not show up on sales transactions. Follow the steps below to achieve this functionality:
1. Open Accounts receivable > Setup > Charges > Charges code.
2. Click New to add a new code.
3. In the Charges code field, type a unique identifier for this charge.
4. In the Description field, type a short description of the charge.
5. Click the Item sales tax group arrow and select the sales tax group.
6. Click the Posting tab.
7. Setup the debit/credit fields as follows:
2. Click New to add a new code.
3. In the Charges code field, type a unique identifier for this charge.
4. In the Description field, type a short description of the charge.
5. Click the Item sales tax group arrow and select the sales tax group.
6. Click the Posting tab.
7. Setup the debit/credit fields as follows:
| Debit | Type | Ledger Account |
| Posting | Specify | |
| Account | Specify | |
| Credit | Type | Ledger Account |
| Posting | Specify | |
| Account | Specify |
Charges Codes for Purchases
For purchases you can configure charges in 4 different ways. Repeat the following basic steps for all of the 4 different configurations then we’ll see how to setup the Posting fastTab:
1. Open Accounts payable > Setup > Charges > Charges code.
2. Click New to add a new code.
3. In the Charges code field, type a unique identifier for this charge.
4. In the Description field, type a short description of the charge.
5. Click the Item sales tax group arrow and select the sales tax group.
6. Click the Posting tab.
2. Click New to add a new code.
3. In the Charges code field, type a unique identifier for this charge.
4. In the Description field, type a short description of the charge.
5. Click the Item sales tax group arrow and select the sales tax group.
6. Click the Posting tab.
Here are the 4 different configurations for the posting fastTab
1. Paying to Creditor – Billing to Item
Setup the debit/credit fields as follows:
| Debit | Type | Item |
| Posting | N/A | |
| Account | N/A | |
| Credit | Type | Customer/Vendor |
| Posting | N/A | |
| Account | N/A |
2. Paying Internally – Billing to Item
Setup the debit/credit fields as follows:
| Debit | Type | Item |
| Posting | N/A | |
| Account | N/A | |
| Credit | Type | Ledger Account |
| Posting | Specify | |
| Account | Specify |
3. Paying to Creditor – Billing Internally
| Debit | Type | Ledger Account |
| Posting | Specify | |
| Account | Specify | |
| Credit | Type | Customer/Vendor |
| Posting | N/A | |
| Account | N/A |
4. Paying Internally – Billing Internally
| Debit | Type | Ledger Account |
| Posting | Specify | |
| Account | Specify | |
| Credit | Type | Ledger Account |
| Posting | Specify | |
| Account | Specify |


No comments:
Post a Comment
Thanks for your time reviewing this blog.