Wednesday, April 23, 2014

Charges Codes in AX 2012

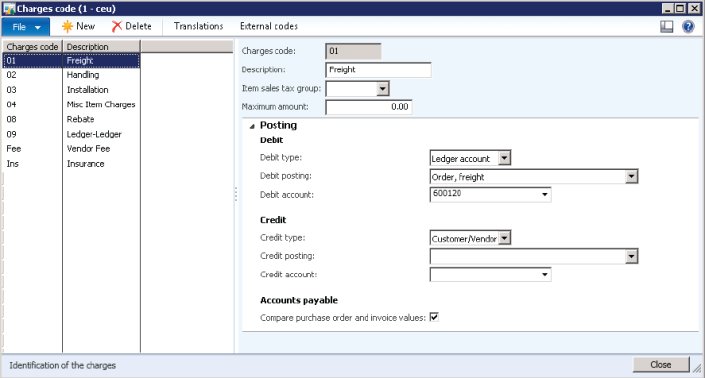
Before you plan to add manual or automatic charges when you create a sales or purchase order, you must setup Charges Codes. They are used to define the kind of charge and how the charge is going to be debited or credited. You can setup charges by navigating to Setup → Charges → Charges codes in the following 3 modules:
1. Accounts Receivable
2. Accounts Payable
3. Procurement and Sourcing
Untitled

Fields on the Charges codes form are described below:
1. Charges code: Unique code for the charge
2. Description: Brief description about the charge
3. Item sales tax group: An item sales tax group that can be used for calculating taxes on the charge
4. Maximum amount: Maximum amount allowed for the charge

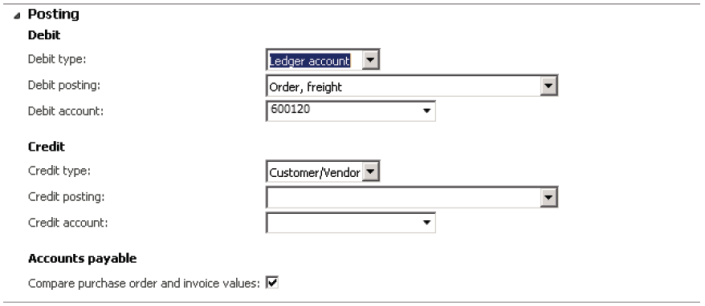
Posting FastTab

Untitled
This is where the actual game happens. In this posting fastTab we define how to automatically debit and credit the charge. Both debit and credit sections have the following fields:
1. Type – Defines the entity which will be billed for the charge. Following are the available options:
  • Item – Charge is added to the item cost
  • Ledger Account – Charge is billed internally to the ledger account
  • Customer/Vendor – Charge is billed to the customer/vendor
2. Posting – Free text field to give the description which will be used while posting the charge to journals
3. Account - Defines the ledger account which must be debited/credited when Type is set to Ledger Account

So far we have understood what is the purpose of different parameters used to configure charges codes. Let us now create charges codes for sales and purchases. In both cases the parameters discussed will be set differently to cater to different needs of sales and purchases.

Charges Codes for Sales

For sales, you can configure charges in 2 different ways:
1. Customer
Charge is billed to the customer and is added to the sales order totals. Follow the steps below to achieve this functionality:
1. Open Accounts receivable > Setup > Charges > Charges code.
2. Click New to add a new code.
3. In the Charges code field, type a unique identifier for this charge.
4. In the Description field, type a short description of the charge.
5. Click the Item sales tax group arrow and select the sales tax group.
6. Click the Posting tab.
7. Setup the debit/credit fields as follows:
DebitTypeCustomer/Vender
PostingN/A
AccountN/A
CreditTypeLedger Account
PostingSpecify
AccountSpecify

2. Ledger Account (Internal)
Charge is billed to an internal ledger account and does not show up on sales transactions. Follow the steps below to achieve this functionality:
1. Open Accounts receivable > Setup > Charges > Charges code.
2. Click New to add a new code.
3. In the Charges code field, type a unique identifier for this charge.
4. In the Description field, type a short description of the charge.
5. Click the Item sales tax group arrow and select the sales tax group.
6. Click the Posting tab.
7. Setup the debit/credit fields as follows:
DebitTypeLedger Account
PostingSpecify
AccountSpecify
CreditTypeLedger Account
PostingSpecify
AccountSpecify

 Charges Codes for Purchases

For purchases you can configure charges in 4 different ways. Repeat the following basic steps for all of the 4 different configurations then we’ll see how to setup the Posting fastTab:
1. Open Accounts payable > Setup > Charges > Charges code.
2. Click New to add a new code.
3. In the Charges code field, type a unique identifier for this charge.
4. In the Description field, type a short description of the charge.
5. Click the Item sales tax group arrow and select the sales tax group.
6. Click the Posting tab.
Here are the 4 different configurations for the posting fastTab
1. Paying to Creditor – Billing to Item
Setup the debit/credit fields as follows:
DebitTypeItem
PostingN/A
AccountN/A
CreditTypeCustomer/Vendor
PostingN/A
AccountN/A

2. Paying Internally – Billing to Item
Setup the debit/credit fields as follows:
DebitTypeItem
PostingN/A
AccountN/A
CreditTypeLedger Account
PostingSpecify
AccountSpecify

3. Paying to Creditor – Billing Internally
DebitTypeLedger Account
PostingSpecify
AccountSpecify
CreditTypeCustomer/Vendor
PostingN/A
AccountN/A

4. Paying Internally – Billing Internally
DebitTypeLedger Account
PostingSpecify
AccountSpecify
CreditTypeLedger Account
PostingSpecify
AccountSpecify

Monday, March 24, 2014

Importing a Budget via the Excel Add-in

Here is an example of how to import a Budget Register Entry through the Excel Add-in using the Contoso Demo Data.
PreConfiguration:  You have installed the Excel Add-in components.  
Area 1:  Configuring the Inbound Port

1.  Open a Development Workspace (CTRL + SHIFT + W).
2.  In the AOT navigate to Services >BudgetTransactionService.
3.  Right-click on it and select Add-ins > Register Service as seen in figure 2.
4.  Close the Development Workspace.
5.   In the AX Client navigate to System Administration > Setup > Services and Application Integration Framework > Inbound Ports.
6.  Select the New button to create a new port and populate the following:
               ·    Port Name: BudgetImport
                ·    Description: Importing Financial Budgets
 7. Select the Service Operations button.
 8.  Add all the services that start with BudgetTransactionService to the left column as seen in figure 4.
Area 2:  Setup with Excel

1.  Open Excel and create a new spreadsheet.
2.  Select the Dynamics AX tab.
3.  Select the Connection button.
4.  Select the Legal Entity that you want to import into and the Account Structure you will evaluate against.
5.  Select the OK button.
6.  On the Dynamics AX tab select the Add Data button > Add Data.
7.  Select the Budget Register Entries selection from the list and select OK.
8.  You should see a form open on the left side of the Excel Spreadsheet with fields that you can drag onto the spreadsheet.
9.  Select the following fields in this order to drag onto the spreadsheet.
·    Ledger.Ledger Name   --- This will pull two fields onto the spreadsheet
·    Budget Code
·    Budget Model
·    Default Date
         10.  Expand the Budget Account Entries node and drag the following field onto the form – move them a couple                         spaces to the left of your last field (Default Date).
1.  Parent.EntryNumber
2.  Date
3.  Currency
4.  LedgerDimension.MainAccount
5.  Comment
6.  Transaction Currency Amount
11.  Close the pane with all the fields that you can drag on to the spreadsheet.
12.  Add the following information into line 2:
Header Entries
     Ledger.Ledger name:  ceu -- (this is the company name).
     Entry Number:  Test1  -- (This is a place holder, your number sequence from within AX will substitute when you import).
     Budget Code:  Budget
     Budget Model:  Sub1
     Default Date:  9/10/2012

Lines Entries
     Ledger Name:  ceu
     Entry Number:  Test1  ---- This must match your header entry number
     Date:  9/10/2012
     Line Number:  1
     Currency:  USD
     LedgerDimension.MainAccount:  170150
     Comment:  Anything you want
     Transaction Currency:  Amount:  10,000
 13.  Select any cell that is blank on the spreadsheet – this will activate the “Publish Data” button.
14.  Select the Publish Data button > Publish All.
 NOTE:  You will see all data from the BudgetTransactionHeader and BudgetTransactionLine tables populate on the spreadsheet which is fine – this is in case you want to update which you can also do from the spreadsheet.
 15.  Open an AX client.
16.  Go to Budgeting > Common > Budget Register Entries.
17.  Search for a budget register entry with the date of the one you entered (9/10/2012 in my case).
You can see it imported correctly.  I can also see that “Test1” was replaced with 000529_1032 which was the next number in my number sequence.

If I wanted to add more lines to this budget entry it would be as easy as adding more lines to your spreadsheet with the correct entry number.

Inventory Valuation Methods in Accounting


Inventory can make up a large amount of the assets on the balance sheet and so knowing how to analyze the inventory, and the method used by management is crucial.

To put it in the most basic form, inventory is what you have in stock. If you expand on this definition to look at what is involved on the other side of the scale to get the ending inventory amount, the equation for inventory is

Beginning Inventory + Net Purchases – Cost of Goods Sold = Ending Inventory

In words, your beginning inventory along with your purchases and then subtracting what you have sold, results in ending inventory.

But this is where it gets tricky with GAAP rules. Depending on the inventory valuation method used by the company, the COGS can vary considerably which ultimately affects the ending inventory.
Sadly, it is not as easy as counting what is left on the shelf at the end of the day to get the ending inventory value.

Basic inventory valuation methods are
1. Average cost method
2. First In First Out (FIFO) method
3. Last in First Out (LIFO) method
Average Cost Method
To put it real bluntly, the average cost method is rarely used. This method does not offer any real convenience or added accuracy.But is easy to track and analyse the inventory movemenet.

The equation for average cost method is as follows.
Average Cost = (Total Quantity of Inventory Units) / (Total Quantity of Units)
where
Cost of Goods Sold = (Average Unit Cost) x (Number of Units Sold)
For example if 1,000 toys are produced on Monday at a cost of $1 and then on Tuesday another 1,000 toys are manufactured at a price of $1.05, the average cost method would value the inventory at $1.025 a piece.
FIFO Method
FIFO method of valuing inventory is considered to be the aggressive method.
FIFO works like how you maintain your fridge at home. After you have bought some groceries, you tend to place what you just bought at the back of the fridge in order to finish off the older food before it spoils.
In other words, under FIFO, the oldest goods are sold first and the newest goods are sold last.
As a formula it would look like this
Unit Cost per batch = (Cost/Quantity) for each batch
where
Cost of Goods Sold = (Unit Cost x Quantity) for each batch
Using the toy example above, if 1,000 toys were then sold on Wednesday, the COGS would be $1 per unit. The remaining inventory on the balance sheet would then be worth $1.05 each.
LIFO Method
LIFO is the opposite of FIFO. Instead of the oldest inventory being considered as sold first, the newest product is sold first. While the factory analogy works for the FIFO, consider a bakery. By lunch or evening, the bread baked from the morning will not sell as well as the fresh ones from the afternoon batch.

This means that cost of the latest inventory now becomes the COGS with the cost of the oldest inventory being assigned to the inventory value on the balance sheet.
The equation is essentially the same as FIFO since both are calculated based on batches of unit sold
.
Unit Cost per batch = (Cost/Quantity) for each batch
where
Cost of Goods Sold = (Unit Cost x Quantity) for each batch

Using the toy example, the 1,000 units sold on Wednesday would have a COGS of $1.05 per unit, with the remaining 1,000 toys being valued at $1 each.
How Inventory Valuation Affects Profits and Assets
As you can see from above, despite ending with the same 1,000 toys, FIFO assigns the inventory value to be $1,050 compared to the LIFO $1,000.
But another point is that the method of inventory valuation does not just affect the balance sheet. Gross profit also varies considerably. How?

Gross Profit = Sales – COGS

COGS differ under FIFO and LIFO, and if your COGS is low, then that means gross profit will increase.

The table below sums up how each of the three inventory valuations vary.

Sunday, March 23, 2014

Process Prepayment in AX 2012

Purchasing agent creates the purchase order and submits a request to AP coordinator to process prepayment:
  • Create a new purchase order under Accounts Payable module for vendor 3107, Alpine Electronics. Let us make a note of their balance before we proceed with a prepaid PO processing for them.
image
  • Create purchase order header and PO line for item(1001) for 600 quantity.
image
  • Click the Purchase tab and click Prepay > Prepayment button.
  • Enter a suitable description for the prepayment for purchase order and enter the prepayment value. In our case, let us assume that vendor has requested 10% prepayment.
  • Enter 10% and verify that the prepayment remaining value which will be 10% of the total PO value. Note that you can also specify a fixed prepayment amount if vendors requests so.
image
Prepayments can be removed after it has been setup on a PO by clicking the Remove prepayment button. if business later cancels the prepayment.
image
*Note: The prepayment category ID is the procurement category against which the prepayment will be tracked
  • Now, Confirm the purchase order after saving the prepayment details.
image
Posting the Prepayment Invoice:
  • To do this, click the Invoice tab in the purchase order form and click Prepayment invoice button.
image
  • Now enter invoice number and click Post > post button to post the prepayment invoice.
image
  • Note the newly created vendor transaction and also take a note of the affected vendor balance. Recording of the prepayment invoice increases the vendor balance. In this scenario it is $4100.25(Vendor balance before prepayment invoice) + $87,720(Prepayment invoice amount).
image
image
AP Coordinator/Manager processes the required prepayment:
  • It’s now AP Manager’s task to make the payment for the prepayment which was requested for the purchase order.
  • Navigate to AP > Journals > create a new payment journal.
  • Click payment journal line and click Functions > Settlement button and select the prepayment invoice.
image
  • Print the check for vendor and post the payment. Make a note of the vendor transactions and the affected vendor balance also after this step. Vendor balance decreases after the payment has been made.
Settle the payment against the final invoice:
  • When the goods arrive and you receive the final invoice from vendor, settle the prepayment with it.
  • Navigate to Purchase order screen > Invoice tab and generate an invoice.
  • Click Apply prepayment button.
image
  • You will notice the prepayment record appearing here in this form. The “Select prepayments to apply” grid displays all the prepayments which could exist for the PO.
  • Also notice the invoice amount is $877200 and available application amount is $87,720 which is 10% of the invoice which was paid as a prepayment to the vendor.
image
  • Finally Select the prepayment and click Apply prepayment button. You will see that the “’Total amount of the prepayment that will be applied to the invoice will be 87720.$.
  • Make a note that one line gets added in the vendor invoice line.
image
  • Now, Post the purchase order invoice by clicking Post.
  • With the PO invoice posted, let us now analyze the financial voucher and the impact on vendor balance.
image
image